Overview
Wordle is a word puzzle game that blew up in popularity during early 2022, in no small part due to the COVID-19 pandemic.
In Wordle, the player has 6 attempts to guess a five-letter word, with the colors of the letters telling the player how accurate their guesses were. Gray means the letter's not in the word, yellow means the letter is in the word but in the wrong position, and green means the letter is in the right position.
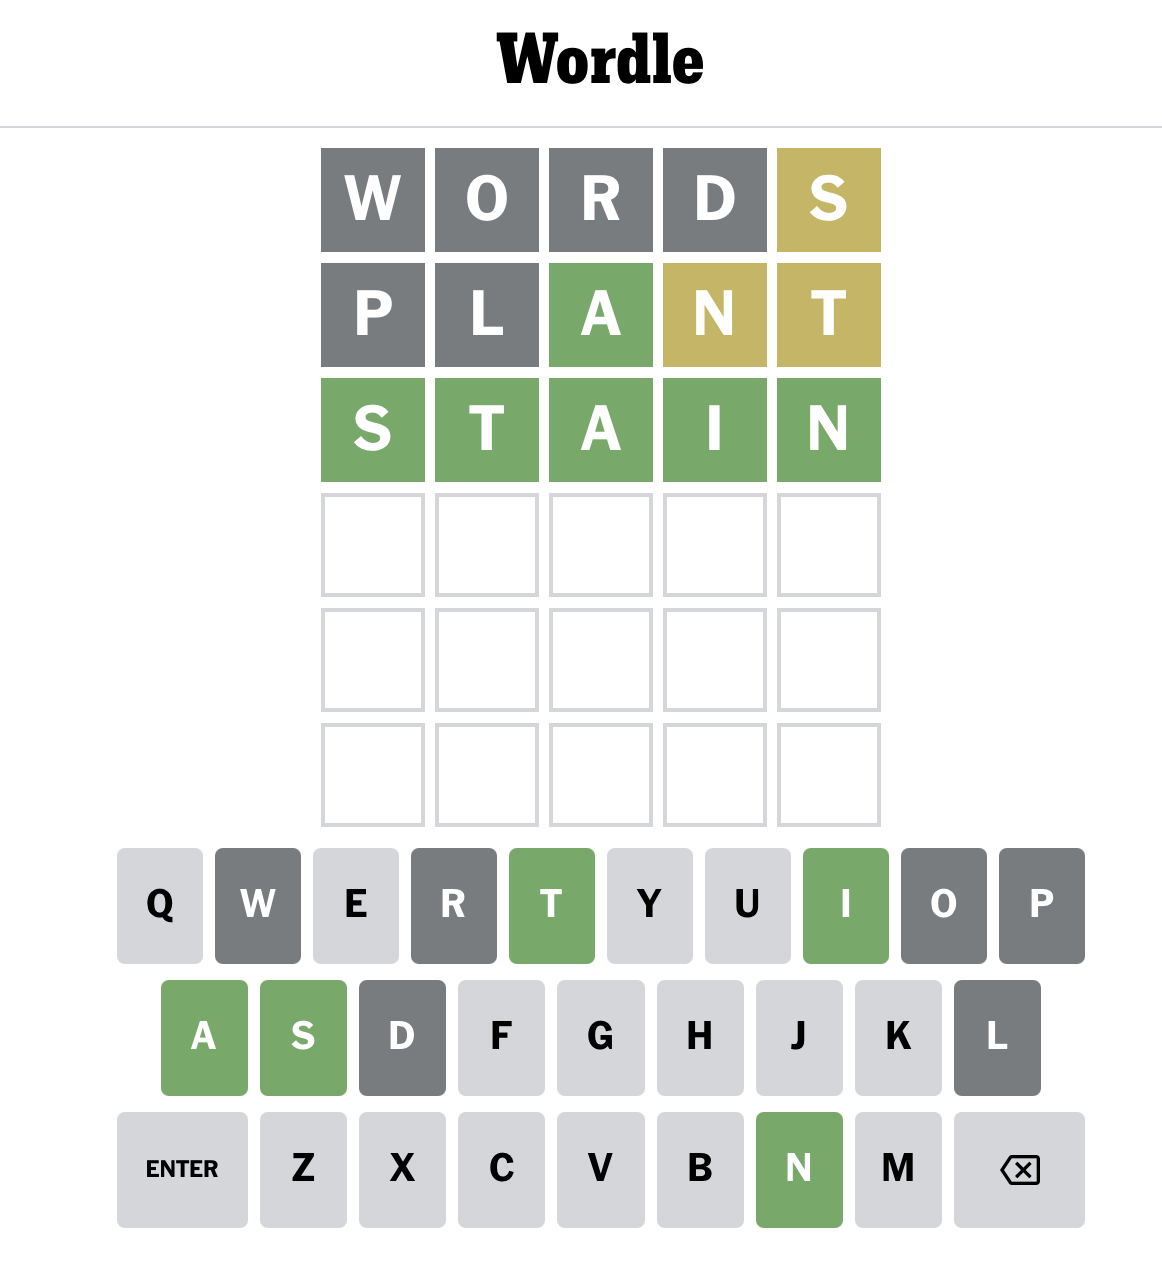
In this article we'll create a website that's a clone of Wordle, using the following:
- TypeScript — TypeScript is a programming language that adds type checking to javascript code. Most javascript developers use typescript to ensure that their code is type-safe and correct.
- React — React is the world's most popular framework for building websites.
- Redux & Redux Toolkit — Redux is a state management library that helps handle complex application logic, it is often paired with React. Redux Toolkit is a library that helps reduce much of Redux's boilerplate and is the recommended way to write Redux code.
- CSS Modules — CSS Modules adds local scoping to css class names, this helps prevent name collisions when naming css classes for multiple components. This feature is integrated as part of vite.
- Vite — Vite is a popular javascript build tool and code bundler.
Prerequisites
This tutorial assumes you have some basic experience using React, as well as general familiarity with programming. I recommend taking a beginner's tutorial for JavaScript and/or React web development if you aren't familiar with either.
Project download
The source code for the completed project can be downloaded here: nerdle.zip.
Coding
With that out of the way, let's open our text editor and start coding!

Creating a Vite project
First make sure you have node.js and npm installed.
To avoid trademark issues with New York Times, I'm going to call our project nerdle.
If you'd like you can replace it with another name, just don't come to me if the
NYT lawyers come knocking at your door.
(Editor's note: the author of this article (me) did not know of the existence of nerdlegame.com while writing this article, of which this article has no association with. Please don't sue me.)
We will use vite to create our project. In your terminal, navigate to a folder where you'd like your project directory to be created, then run:
npm create vite nerdleSelect the framework React with variant TypeScript.
Voilà, you now have an entire React app scaffolded out! Run these commands to install all required dependencies and start the development server:
cd nerdle
npm install
npm run dev
Vite should display a local URL that you can use to view your website locally in a browser.
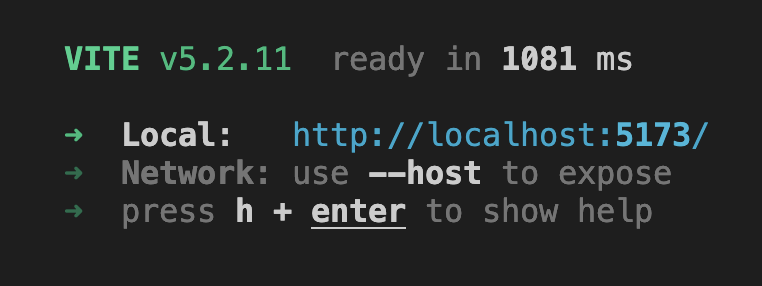
Entering the URL into your browser, you should see the default project webpage for React.
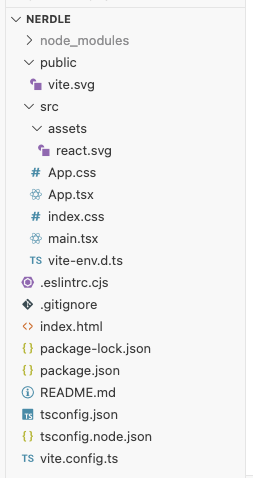
Open the nerdle directory in your favorite code editor. You should see a
project directory similar to the following:
Planning the user interface
Before starting to code, it's helpful to create a mock up of what your user interface will look like. This doesn't have to be fancy, often a quick sketch on a piece of paper is enough. What's important is that you're able to identify the major components of your design and how they are positioned relative to each other.
Here's the mock up we'll use for our game:

We've got 4 major components here, lined up vertically in the middle of the page:
- Title — This will just display our game's name: Nerdle.
- Game Board — A 5-by-6 grid of colored tiles with letters. Each tile is one of 4 colors: yellow, green, black (dark gray), or empty (no color).
- Results Text — Displays a message when the game is won or lost, otherwise will be empty.
- Keyboard — A grid of keyboard buttons, with some keys colored depending on the game state.
Constructing the skeleton layout
Now that we have a basic design in mind, let's start building our app!
A great place to start whenever you're coding a web application is to code the ui components of your app without any logic or functionality.
Delete everything in the src/ directory except for main.tsx, index.css, App.tsx, and vite-env.d.ts.
Our main.tsx should look something like this:
import React from "react";
import ReactDOM from "react-dom/client";
import App from "./App.tsx";
import "./index.css";

ReactDOM.createRoot(document.getElementById("root")!).render(
  <React.StrictMode>
    <App />
  </React.StrictMode>,
);
In this file, we take the DOM node with id root (see index.html)
and set that as our React root, then render the main app component into that div.
React.StrictMode will cause react to do some extra checks
during development to ensure that our code is correct.
Delete everything in src/index.css and replace it with the following:
body {
  font-family: Arial, sans-serif;
}
For this project we will make use of CSS modules so that our styles are locally
scoped to each component, thus our global index.css file won't contain much styling.
Let's create our main app component. Replace the contents of src/App.tsx with:
import styles from "./App.module.css";

export default function App() {
  return (
    <div className={styles.app}>
      <h1 className={styles.title}>Nerdle</h1>
      {/* Board will go here */}
      <p className={styles.statusText}>You Win!</p>
      {/* Keyboard will go here */}
    </div>
  );
}
Create the file src/App.module.css, then add the following styles:
.app {
  padding: 16px;
  display: flex;
  flex-direction: column;
  align-items: center;
  gap: 16px;
}

.title {
  font-size: 32px;
}

.statusText {
  font-size: 24px;
}
The main app div is styled as a single column using display: flex and some other properties,
just as we wanted in our design.
Notice the .module.css extension, this enables the CSS modules feature which
allows us to import the css class names as strings from within javascript!
Let's finish up the app skeleton with the board and keyboard components.
The board component is straightforward, it's simply a 5×6 grid of cells. We can make use of CSS grid to achieve this. Create the following files:
import styles from "./Board.module.css";
import { ReactNode } from "react";

export default function Board() {
  const cells: ReactNode[] = [];

  // Empty cells
  const emptyRows = 6;
  for (let i = 0; i < emptyRows * 5; i++) {
    const cell = <div key={`empty-${i}`} className={styles.cell}></div>;
    cells.push(cell);
  }

  return <div className={styles.board}>{cells}</div>;
}.board {
display: grid;
grid-template-columns: repeat(5, auto);
gap: 4px;
}
.cell {
width: 52px;
height: 52px;
border: 2px solid #bdbdbd;
box-sizing: border-box;
color: #212121;
font-size: 30px;
display: flex;
align-items: center;
justify-content: center;
}Here we generate a list of empty cells and set that as the children of our board element.
Notice how we set a unique key string for each cell in the list:
In React, it is important that all elements in a list have a unique key property
so that during rendering React can match elements in a list
to maintain performance.
Next, let's create our keyboard component.
In this component we will have nodes with multiple class names,
let's install the popular classnames npm utility module to help
manage multiple class names on a DOM node:
npm install classnamesNext let's create the keyboard component.
We define the small component <Key /> that represents a key on the on-screen keyboard,
it will take some properties like char and wide to control how it is displayed.
Then we construct our main keyboard component from a bunch of <Key /> components.
import styles from "./Keyboard.module.css";
import cn from "classnames";
const CHAR_ENTER = "↩";
const CHAR_BACKSPACE = "⌫";
export default function Keyboard() {
return (
<div className={styles.keyboard}>
<div className={styles.row}>
<Key char="Q" />
<Key char="W" />
<Key char="E" />
<Key char="R" />
<Key char="T" />
<Key char="Y" />
<Key char="U" />
<Key char="I" />
<Key char="O" />
<Key char="P" />
</div>
<div className={styles.row}>
<Key char="A" />
<Key char="S" />
<Key char="D" />
<Key char="F" />
<Key char="G" />
<Key char="H" />
<Key char="J" />
<Key char="K" />
<Key char="L" />
</div>
<div className={styles.row}>
<Key char={CHAR_ENTER} wide />
<Key char="Z" />
<Key char="X" />
<Key char="C" />
<Key char="V" />
<Key char="B" />
<Key char="N" />
<Key char="M" />
<Key char={CHAR_BACKSPACE} wide />
</div>
</div>
);
}
type KeyProps = {
char: string;
wide?: boolean;
};
function Key(props: KeyProps) {
return (
<button className={cn(styles.key, props.wide && styles.wide)}>
{props.char}
</button>
);
}.keyboard {
display: flex;
flex-direction: column;
gap: 4px;
}
.row {
display: flex;
gap: 4px;
justify-content: center;
}
.key {
width: 40px;
height: 48px;
border: none;
font-size: 24px;
display: flex;
align-items: center;
justify-content: center;
}
.key.wide {
width: 64px;
}Our keyboard is styled in 3 rows, with each key being 40×48 px in dimension. The enter and backspace keys are slightly wider at 64×48 px.
The classnames utility combines class names together, removing any falsy values.
For example, cn("key", "wide") === "key wide", and
cn("key", false) === "key".
Notice that the wide property of the <Key /> component has no value,
in React this is short hand for the boolean true.
That is, <Key wide /> is equivalent to <Key wide={true} />.
Let's add these components to our App component:
import styles from "./App.module.css";
import Board from "./Board";
import Keyboard from "./Keyboard";
export default function App() {
return (
<div className={styles.app}>
<h1 className={styles.title}>Nerdle</h1>
<Board />
<p className={styles.statusText}>You Win!</p>
<Keyboard />
</div>
);
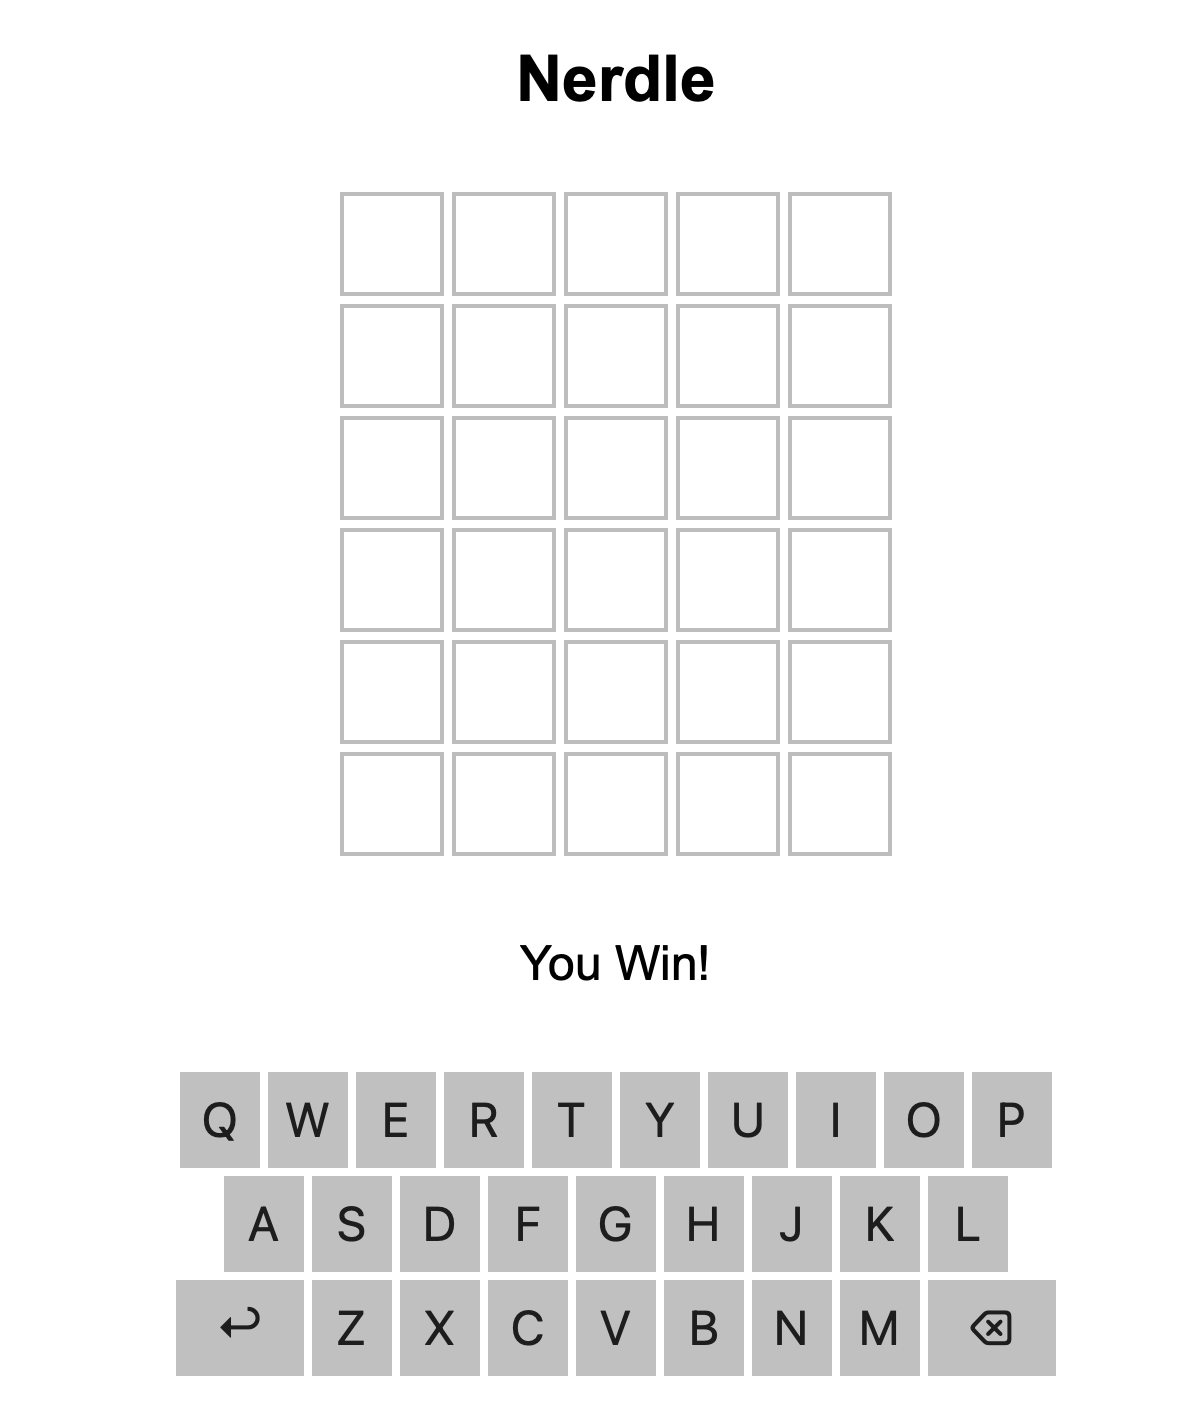
}Our app skeleton layout is now complete. If you followed all the steps properly, your app should now look something like this:
Creating the Redux store
In react, the basic way of managing application state is using the useState hook. This works fine for smaller apps but when your application becomes larger it's useful to use a library to manage state across your whole app.
This tutorial uses redux for state management since it's one of the most popular state management libraries used with react.
Create a new directory src/store, this is where we'll put our state management code.
Next, download the wordlist.json file and move it to src/store/wordlist.json.
This file contains the list of target words, as well as all the words that are valid
guesses for our game.
{
"target": [
"ABACK",
"ABASE",
/* a few thousand other words ... */
"ZONAL"
],
"valid": [
"AAHED",
"AALII",
/* a few thousand other words ... */
"ZYMIC"
]
}Now, we'll start constructing our redux store. First we'll need to install redux, as well as the bindings for redux with react.
npm install @reduxjs/toolkit react-reduxIn redux, application state is stored in a global object called the 'store'. Unlike most state management code, redux does not allow you to directly mutate data in the store. Instead, you must dispatch an object called an 'action' to the store, which contains info about how you'd like to update the store. The action is passed to a reducer function which takes an action and the current state of the store and accordingly creates a new version of the store state.
This approach to state management is called the 'flux' design pattern, and leads to a uni-directional data flow which is easy to follow and debug. For example, you can install the redux devtools browser extension which allows you to "time travel" across snapshots of your application state to quickly identify bugs with your redux store.
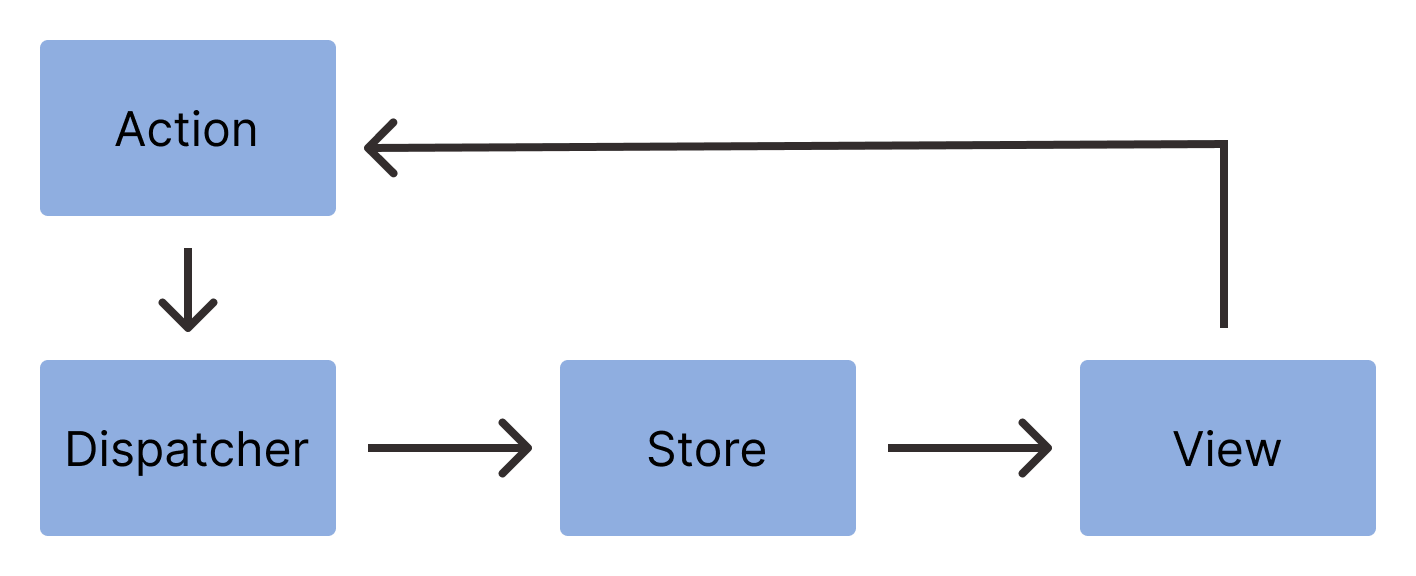
Redux toolkit provides convenient helpers for defining our redux store; for
example, the createSlice function allows us to define the initial application
state, actions that modify that state, and reducer functions that take actions
to update the state, all using one function. Typically a complex
application will define multiple slices to separate different parts of their
app's data, however since our app is pretty simple we'll only need one slice.
Let's first define the shape and initial state of our store. Create
src/store/index.ts, then write:
export type Game = {
target: string;
guesses: string[];
input: string;
gameOver: boolean;
};
const initialState: Game = {
target: "AAAAA",
guesses: [],
input: "",
gameOver: false,
};Our game state has 4 properties:
target— The target word being guessed by the player.guesses— A list of the guesses that the player has made.input— The letters that our player currently is typing, always between 0-5 chars long.gameOver— Whether the game is over, true when the player has guessed the word or used all 6 guesses.
Next, we'll create our redux slice. The first action we will implement is the start action, which randomly chooses the target word and initializes the game state.
import { PayloadAction, createSlice } from "@reduxjs/toolkit";
import WORD_LIST from "./wordlist.json";
/* ... */
const gameSlice = createSlice({
name: "game",
initialState,
reducers: {
start(_state, action: PayloadAction<number>) {
const targetWords = WORD_LIST.target;
const target = targetWords[action.payload % targetWords.length];
return {
target,
guesses: [],
input: "",
gameOver: false,
};
},
},
});Note that each redux reducer function must be a pure function—given the same action and previous state the reducer function must always return the same value. This is an important rule to follow to make your state management code predictable and debuggable.
In this case, a random "seed" number is passed to the start function to make the chosen target word deterministic. Later in the react component we will pass a random seed to this function.
Next, let's create actions for the user inputting a letter, pressing backspace, and pressing enter to submit a guess.
import { PayloadAction, createSlice } from "@reduxjs/toolkit";
import WORD_LIST from "./wordlist.json";
/* ... */
const gameSlice = createSlice({
name: "game",
initialState,
reducers: {
start(_state, action: PayloadAction<number>) {
const targetWords = WORD_LIST.target;
const target = targetWords[action.payload % targetWords.length];
return {
target,
guesses: [],
input: "",
gameOver: false,
};
},
inputLetter(state, action: PayloadAction<string>) {
if (state.input.length < 5) {
state.input = state.input + action.payload;
}
},
inputBackspace(state) {
if (state.input.length > 0) {
state.input = state.input.substring(0, state.input.length - 1);
}
},
inputEnter(state) {
const input = state.input;
if (input.length !== 5) {
return;
}
if (!WORD_LIST.valid.includes(input)) {
return;
}
state.guesses.push(input);
state.input = "";
if (input === state.target || state.guesses.length === 6) {
state.gameOver = true;
}
},
},
});Note that with redux toolkit, your reducer functions can either return a new value for the state or directly mutate the state value.
Finally we'll create the redux store and export all our store actions, as well as a selector function which will be used by our react components to access our store.
import { PayloadAction, configureStore, createSlice } from "@reduxjs/toolkit";
import WORD_LIST from "./wordlist.json";
import { TypedUseSelectorHook, useSelector } from "react-redux";
/* ... */
export const gameAction = gameSlice.actions;
export const store = configureStore({
reducer: {
game: gameSlice.reducer,
},
});
export type AppState = ReturnType<typeof store.getState>;
export const useAppSelector: TypedUseSelectorHook<AppState> = useSelector;All together, your file should look like this:
import { PayloadAction, configureStore, createSlice } from "@reduxjs/toolkit";
import WORD_LIST from "./wordlist.json";
import { TypedUseSelectorHook, useSelector } from "react-redux";
export type Game = {
target: string;
guesses: string[];
input: string;
gameOver: boolean;
};
const initialState: Game = {
target: "AAAAA",
guesses: [],
input: "",
gameOver: false,
};
const gameSlice = createSlice({
name: "game",
initialState,
reducers: {
start(_state, action: PayloadAction<number>) {
const targetWords = WORD_LIST.target;
const target = targetWords[action.payload % targetWords.length];
return {
target,
guesses: [],
input: "",
gameOver: false,
};
},
inputLetter(state, action: PayloadAction<string>) {
if (state.input.length < 5) {
state.input = state.input + action.payload;
}
},
inputBackspace(state) {
if (state.input.length > 0) {
state.input = state.input.substring(0, state.input.length - 1);
}
},
inputEnter(state) {
const input = state.input;
if (input.length !== 5) {
return;
}
if (!WORD_LIST.valid.includes(input)) {
return;
}
state.guesses.push(input);
state.input = "";
if (input === state.target || state.guesses.length === 6) {
state.gameOver = true;
}
},
},
});
export const gameAction = gameSlice.actions;
export const store = configureStore({
reducer: {
game: gameSlice.reducer,
},
});
export type AppState = ReturnType<typeof store.getState>;
export const useAppSelector: TypedUseSelectorHook<AppState> = useSelector;Crafting some algorithms
Before we connect our redux store to the react components, we need to take a brief detour and write some helper functions.
The first function we'll write is an algorithm to determine the colors of a guessed word given a target word. For the colors we'll use the convention "G" = green, "Y" = yellow, and "B" = black, our function will return a string with one of "G", "Y" or "B" for each letter in the guess. A letter should be green if it's in the correct position in the target word, yellow if it's in the target word but in a wrong position, and black if it isn't in the target word.

One edge case that's often overlooked with coloring wordle guesses is how duplicate unmatched letters are handled. For example, what should the coloring for MAMMA be if the target word is MAXIM?

The correct coloring is GGYBB: notice that the second M is yellow, while the third M is black. The rule for duplicate letters is that, after matching green letters in the guess word, each remaining unmatched letter in the target word is assigned to one yellow letter in the guess word in left-to-right order. Thus for a given letter, the number of green and yellow letters in the guess word should never exceed the number of that letter in the target word.
Create the file src/funcs.ts, this is where we'll place our helper functions.
The following is an implementation of the wordle coloring algorithm:
// Given a guess word and target word, returns a 5-letter string consisting of
// either "B", "Y", or "G" representing a black, yellow, or green letter guess
// e.g. wordColor("XYCEZ", "ABCDE") returns "BBGBY"
export function wordColor(target: string, guess: string): string {
const colors: string[] = ["B", "B", "B", "B", "B"];
// Find green letters
const unmatched = new Map<string, number>();
for (let i = 0; i < 5; i++) {
if (guess[i] === target[i]) {
colors[i] = "G";
} else {
const count = unmatched.get(target[i]) ?? 0;
unmatched.set(target[i], count + 1);
}
}
// Find yellow letters
for (let i = 0; i < 5; i++) {
if (colors[i] === "G") {
continue;
}
const count = unmatched.get(guess[i]);
if (count !== undefined && count > 0) {
colors[i] = "Y";
unmatched.set(guess[i], count - 1);
}
}
return colors.join("");
}The second helper function we need to write is a function that returns the color of the keys on the keyboard. A letter on the keyboard is green if it's been guessed in the right position, yellow if it's been guessed in an incorrect position, black if it's not in the word, and gray if it's not been guessed in a word yet.
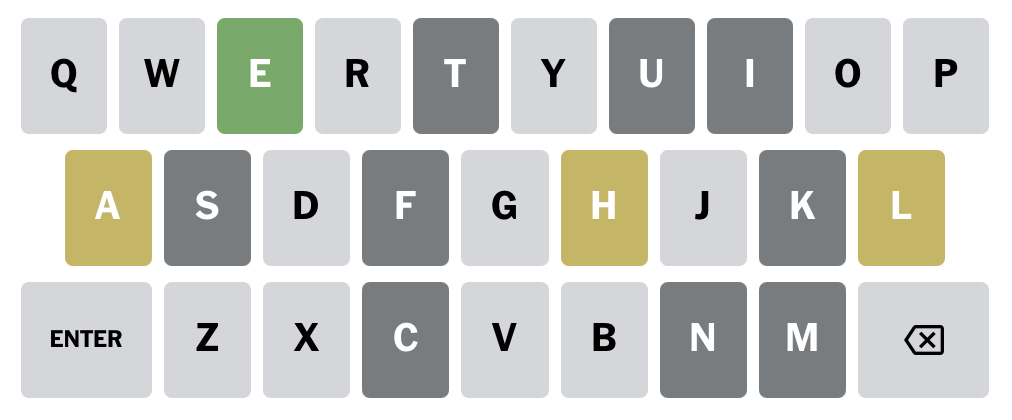
The idea for the algorithm is that for a given letter, we look through all the colored letters in every guess and keep track of the "best" color for that given letter. For example, if our letter is 'P', if we find a yellow P in one word and also a green P in another word, the best color for P is green. If P isn't found in any words, then we return an empty string.
Below is our algorithm for getting the key color:
/* ... */
const COLOR_MAP = new Map([
["", 0],
["B", 1],
["Y", 2],
["G", 3],
]);
// Returns the color of a keyboard key given the current list of guesses
export function keyColor(
key: string,
target: string,
guesses: string[],
): string {
let bestColor = "";
const colors = guesses.map((guess) => wordColor(target, guess));
for (let i = 0; i < guesses.length; i++) {
for (let j = 0; j < 5; j++) {
if (guesses[i][j] === key) {
const color = colors[i][j];
if (COLOR_MAP.get(color)! > COLOR_MAP.get(bestColor)!) {
bestColor = color;
}
}
}
}
return bestColor;
}Wiring it all together
Alright, we're almost done! Now that we have all our state management code, we just have to hook it up to our react components.
First in src/main.tsx, we need to wrap our app component in the react-redux
<Provider/> component, so that our react components have access to our
redux store:
import React from "react";
import ReactDOM from "react-dom/client";
import App from "./App.tsx";
import "./index.css";
import { Provider } from "react-redux";
import { store } from "./store/index.ts";
ReactDOM.createRoot(document.getElementById("root")!).render(
<React.StrictMode>
<Provider store={store}>
<App />
</Provider>
</React.StrictMode>,
);First let's wire up our state to the board component.
We will use the useAppSelector hook to access parts of our store. This hook
will rerender our component whenever the part of the store that it accesses
changes.
Add the following code to src/Board.tsx so that it displays the state of our game:
import styles from "./Board.module.css";
import cn from "classnames";
import { useAppSelector } from "./store";
import { ReactNode } from "react";
import { wordColor } from "./funcs";
export default function Board() {
const input = useAppSelector((s) => s.game.input);
const target = useAppSelector((s) => s.game.target);
const guesses = useAppSelector((s) => s.game.guesses);
const gameOver = useAppSelector((s) => s.game.gameOver);
const cells: ReactNode[] = [];
// Guessed letters
for (let i = 0; i < guesses.length; i++) {
const guess = guesses[i];
const colors = wordColor(target, guess);
for (let j = 0; j < 5; j++) {
const cell = (
<div
key={`cell-${i}-${j}`}
className={cn(
styles.cell,
colors[j] === "B" && styles.black,
colors[j] === "Y" && styles.yellow,
colors[j] === "G" && styles.green
)}
>
{guess[j]}
</div>
);
cells.push(cell);
}
}
// Input letters
const showInput = !gameOver;
if (showInput) {
for (let i = 0; i < 5; i++) {
const cell = (
<div key={`input-${i}`} className={styles.cell}>
{input[i] ?? ""}
</div>
);
cells.push(cell);
}
}
// Empty cells
const emptyRows = 6 - (showInput ? 1 : 0) - guesses.length;
for (let i = 0; i < emptyRows * 5; i++) {
const cell = <div key={`empty-${i}`} className={styles.cell}></div>;
cells.push(cell);
}
return <div className={styles.board}>{cells}</div>;
}We'll also need to add new classes for each of the 3 cell colors. Note
that in CSS, a selector of the form .classA.classB will select DOM nodes
that have the class classA and classB:
.board {
  display: grid;
  grid-template-columns: repeat(5, auto);
  gap: 4px;
}

.cell {
  width: 52px;
  height: 52px;
  border: 2px solid #bdbdbd;
  box-sizing: border-box;
  color: #212121;
  font-size: 30px;
  display: flex;
  align-items: center;
  justify-content: center;
}
.cell.black {
border: none;
background-color: #424242;
color: #ffffff;
}
.cell.yellow {
border: none;
background-color: #fbc02d;
color: #ffffff;
}
.cell.green {
border: none;
background-color: #388e3c;
color: #ffffff;
}Next we'll hook up our keyboard to work with the store.
To listen to keyboard events, we will use the useEffect hook to add a keyboard listener to the global window object after the keyboard component renders for the first time.
We'll use the useDispatch hook, which returns a dispatcher function that we can use to
dispatch actions to our store.
Make the following changes to src/Keyboard.tsx:
import { useDispatch } from "react-redux";
import styles from "./Keyboard.module.css";
import cn from "classnames";
import { gameAction, useAppSelector } from "./store";
import { useEffect } from "react";
import { keyColor } from "./funcs";

const CHAR_ENTER = "↩";
const CHAR_BACKSPACE = "⌫";
const CHAR_CODE_A = "A".charCodeAt(0);
const CHAR_CODE_Z = "Z".charCodeAt(0);

export default function Keyboard() {
  const dispatch = useDispatch();

  useEffect(() => {
    const handler = (e: KeyboardEvent) => {
      const key = e.key.toUpperCase();
      if (e.shiftKey || e.metaKey || e.ctrlKey || e.altKey) {
        return;
      } else if (
        key.length === 1 &&
        key.charCodeAt(0) >= CHAR_CODE_A &&
        key.charCodeAt(0) <= CHAR_CODE_Z
      ) {
        e.preventDefault();
        dispatch(gameAction.inputLetter(key));
      } else if (key === "ENTER") {
        e.preventDefault();
        dispatch(gameAction.inputEnter());
      } else if (key === "BACKSPACE") {
        e.preventDefault();
        dispatch(gameAction.inputBackspace());
      }
    };

    window.addEventListener("keydown", handler);
    return () => window.removeEventListener("keydown", handler);
  }, [dispatch]);

  return (
    <div className={styles.keyboard}>
      <div className={styles.row}>
        <Key char="Q" />
        <Key char="W" />
        <Key char="E" />
        <Key char="R" />
        <Key char="T" />
        <Key char="Y" />
        <Key char="U" />
        <Key char="I" />
        <Key char="O" />
        <Key char="P" />
      </div>
      <div className={styles.row}>
        <Key char="A" />
        <Key char="S" />
        <Key char="D" />
        <Key char="F" />
        <Key char="G" />
        <Key char="H" />
        <Key char="J" />
        <Key char="K" />
        <Key char="L" />
      </div>
      <div className={styles.row}>
        <Key char={CHAR_ENTER} wide />
        <Key char="Z" />
        <Key char="X" />
        <Key char="C" />
        <Key char="V" />
        <Key char="B" />
        <Key char="N" />
        <Key char="M" />
        <Key char={CHAR_BACKSPACE} wide />
      </div>
    </div>
  );
}

type KeyProps = {
  char: string;
  wide?: boolean;
};

function Key(props: KeyProps) {
  const dispatch = useDispatch();
  const target = useAppSelector((s) => s.game.target);
  const guesses = useAppSelector((s) => s.game.guesses);

  const charCode = props.char.charCodeAt(0);
  const isAlphabet = charCode >= CHAR_CODE_A && charCode <= CHAR_CODE_Z;
  let color = "";
  if (isAlphabet) {
    color = keyColor(props.char, target, guesses);
  }

  const handleClick = () => {
    if (isAlphabet) {
      dispatch(gameAction.inputLetter(props.char));
    } else if (props.char === CHAR_BACKSPACE) {
      dispatch(gameAction.inputBackspace());
    } else if (props.char === CHAR_ENTER) {
      dispatch(gameAction.inputEnter());
    }
  };

  return (
    <button
      onClick={handleClick}
      className={cn(
        styles.key,
        props.wide && styles.wide,
        color === "B" && styles.black,
        color === "Y" && styles.yellow,
        color === "G" && styles.green,
      )}
    >
      {props.char}
    </button>
  );
}
Lastly, we'll update src/App.tsx to start the game once the component loads,
and also update the status text depending on whether the user has won / lost
the game.
import { useEffect } from "react";
import styles from "./App.module.css";
import Board from "./Board";
import Keyboard from "./Keyboard";
import { gameAction, useAppSelector } from "./store";
import WORDLIST from "./store/wordlist.json";
import { useDispatch } from "react-redux";

export default function App() {
  const dispatch = useDispatch();
  const gameOver = useAppSelector((s) => s.game.gameOver);
  const isWin = useAppSelector((s) => s.game.guesses.includes(s.game.target));
  const input = useAppSelector((s) => s.game.input);

  useEffect(() => {
    dispatch(gameAction.start(Date.now()));
  }, [dispatch]);

  let statusText = "";
  if (isWin) {
    statusText = "🎉 You Win! 🎉";
  } else if (gameOver) {
    statusText = "Better luck next time! 😢";
  } else if (input.length === 5 && !WORDLIST.valid.includes(input)) {
    statusText = `Not a valid word: ${input}`;
  }

  return (
    <div className={styles.app}>
      <h1 className={styles.title}>Nerdle</h1>
      <Board />
      <p className={styles.statusText}>{statusText}</p>
      <Keyboard />
    </div>
  );
}
If everything went correctly, you should now have a functioning game of Wordle running in your browser!
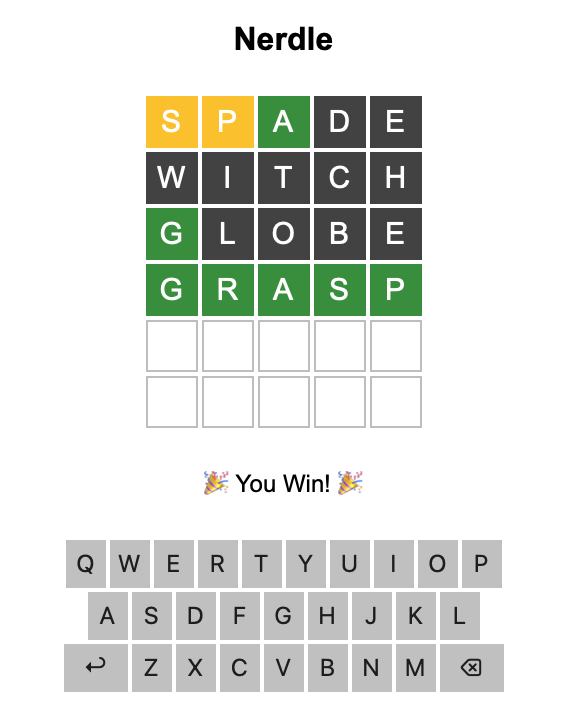
You should be able to type guesses with both the on-screen and your physical keyboard, an appropriate warning should show if you input something that isn't a word. A message should show whenever you win or lose the game. You can restart the game with a new random word by refreshing the page.
Further ideas
Congratulations on completing the tutorial! If you're hungry for a bigger challenge, here are some further ideas for this project:
- Wordle is typically a daily game with a unique word to guess each day. Can you make the word unique for each day, instead of randomly generating it on page load?
- Can you implement a stats system, so that the user can see their scores for previous games? This may involve storing data to the browser's local storage.
- Can you add a timer that tracks how long a player took to complete the game? Hint: store the start time in the store when the user types their first guess.
- Currently
wordColoris run 27 times per render (once for the board, and 26 times for each letter in the keyboard). Can you improve the efficiency of the program by reducing the number of calls to this function during each rerender?